Sunday, October 22, 2017

Sharing the Love


My sweet granddaughter and daughter in law have been learning to make cards with stamps and inks I have been sending them over the years. But they live in Oregon and I am in Florida, so when I get to visit we pull out the stash from the closet and I make cards with them. Last time I showed Liane how to heat emboss. I have been going through my abundance of supplies and am thinning out some of my old stamps and tools to make room for my new Fun Stampers Journey supplies and, of course, Liane and Luci are getting some of my "love"! The latest box has a cuttlebug machine and some dies. Embossing folders will be in the second box.

I am hoping to make videos to share online and this is my very first "how to" video in which I show how to use the Cuttlebug machine. In the video I couldn't remember how to get the Nestabilities die to emboss. Gina K does a much better job when she shows how to use a shim in her Stamp TV video on YouTube here. There are other Cuttlebug videos done by Gina K there as well.


Sunday, October 15, 2017

Stamping with Friends

I was able to have a few friends here yesterday and we made these cards for fall and Christmas.

pierced card, inks, and ribbon
coloring with pencils and
sponged for highlighting

embossed sentiment and
small ornaments with silver
embossed flowers with white
and sponged distress inks on top

I added my initials as a kind of watermark.


Thursday, October 12, 2017

Autumn Greetings

I have been making cards with a fall theme this week.
This one is my favorite.

I first stamped a white 4 x 5 1/4 in. card with the ink splat stamp using rich coral, pineapple smoothie, orange rave, and oatmeal cookie(all FSJ inks).

Then I ran the card through the Amaze machine with the Fall Text embossing folder( a Bloom Benefit, free with a $100 order). Then I used a hard sponge and hazelnut blend ink to rub lightly over the embossing and bring out the words.

I used scraps of paper from my stash, Versamark ink, and the Hello Fall stamps and dies to make the leaves.

I used an 8 1/2 x 11 piece of kraft card stock for the base and glued down the front piece.

Lastly I stamped the sentiment from the Hello Fall set, punched it out with FSJ 2" scalloped oval, sponged the edges with that same hazlenut blend inked sponge, mounted it with small foam squares, and put journey glaze over the whole tag.


I love the way the ink spot stamp looks like leaves in the background.

Friday, October 6, 2017

Pan Pastels

I needed to make a card that was one layer, so nothing glued on. I used my pan pastels to color the background, then stamped the images on top. I colored the turtles with colored pencils, using a white eraser first over the red area because I wanted to take out the background color before coloring.


All products are from Fun Stampers Journey.

Friday, September 29, 2017

Breast Cancer Awareness Month

Fun Stampers Journey is hoping to receive at least 500 cards during the month of October to send as encouragement to patients battling cancer. You can help by creating cards and sending them to the company. You do not have to use FSJ products. Click here to go to FSJ blog and learn more. Let me know if you are willing to help.

 Click here to go to FSJ blog and learn more.

Saturday, September 2, 2017

Happy Hello

Thanks to Ann R in our Sisters in Stamping group who shared this stamp with us and her "Antiquities" embossing powder from Stampendous and available at Sparkle and Sprinkle. After embossing the image, I used water based markers and a water brush to add a wash of color and then color to the individual cats. Lastly I used stardust gel pens to color the eyes and small areas of the cats. The sentiment is an old one from The Angel Company that is one of the many from my stash of stamps.
 This one will make a great card for a friend who loves cats.

Wednesday, August 2, 2017

An Oldie but Goodie

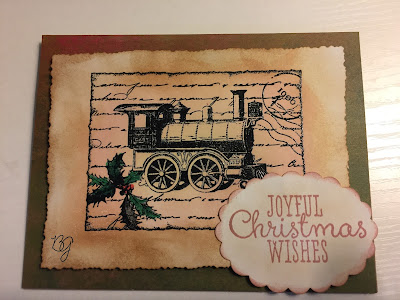
I made this Christmas card today to share with my Sisters in Stamping group. The Train Collage stamp and paper behind the image are from The Angel Company, which is no longer in business. The inks used were Fun Stampers Journey Black Licorice, embossed with clear powder, and then sponged with Distress Inks( antique linen, tattered rose, and vintage photo). Lastly I used Copic markers(G19 and R27) to color the leaves and berries. The image was trimmed with deckle scissors before mounting on fun foam to add dimension. I stamped the sentiment(from the SU Joyful Christmas set) with Victorian Velvet Distress Ink, punched it out with my Marvy scalloped oval, and sponged more of the victorian velvet around the edge.


Friday, July 21, 2017

Stamping with friends

Last month I designed 4 cards and invited some friends over to make them. I have so much paper and stuff, I need to do this more often to get it all used! So here are the cards I designed.

This card uses an old background stamp and a current set from Fun Stampers Journey.

These stamps are from old TAC sets.

This is a current FSJ stamp set, but the turtle paper is no longer available.

The doily die is available at FSJ, but the doily stamps are currently not available. It was in the May Bloom Box.
The paper is either from Stamping Up, Bazill, or Fun Stampers Journey. I added my initials to each photo to protect my designs from being "pirated".

Tuesday, April 11, 2017

Easter Blessings

Happy Easter everyone! When I was at the stamping retreat, Sheila Alexander taught us how to make the teepee style card with 4 1/4 inch squares. Someone else suggested making one with 6 inch squares, so that is what I did for an Easter decoration to give my mother in law who is just getting out of the hospital/rehab after many weeks. Here are the pictures of the 3 outer sides.


When you want to put it in an envelope, you unfold it and it lays flat. This one will be hand delivered, so it is ok if one corner peeks out of the 6.5 x 8.5 inch envelope. The smaller ones we made at retreat fit a standard A2 envelope. If you want more ideas checkout my Pinterest board.

Friday, March 24, 2017

another alligator card

I instructed this Joy fold card at my Sisters in Stamping group this past Wednesday.  This is the first time I have made this Joy fold in a vertical fashion. I used velcro to help keep it closed. I just love these funny stamps from Fun Stampers Journey.


Saturday, March 18, 2017

Punny Punny

I signed up for the Bloom Box program at Fun Stampers Journey. Each month an exclusive stamp set and the materials to make 4 cards are sent to your house for only $24.95, plus tax and shipping. You can see the stamp set for the month you are joining by opening the tab called "Bloom Box" on my page. (link above) You must agree to accept shipments for six months. The next five months will be a surprise. I love surprises and I really thought the March stamp set "Punny Punny" was really something to smile about. Here are the first two cards from the kit. If you know me, you know I have to change something even the first time. I decided to mask the answer to the question of the pun and stamp it not he inside of the card. If you gots to know, follow the links above to see this month's Bloom Box.Also the alligator card called for the same kind of sequins that are on the pepper card, but I chose to leave them off. The kit comes with a full color direction booklet. This month's had 11 pages, including two tips and techniques. The technique of embossing with plastic stencils was new to me.


Not only will this stamp set be a fun one to send to kids, I expect to use it for thinking of you, sending a smile to my adult friends and family, too. Come back in a day or two to check out the remaining two cards.

Saturday, February 4, 2017

Fun Stampers Journey die Heart Strip

Here is a card I will be making with my Sisters in Stamping this week using my new Fun Stampers Journey die set Heart Strip (DI-0267). The sentiment stamp is an old TAC one from my stash.


Wednesday, February 1, 2017

Sisters in Stamping

Here is the card that my "seestahs" made today at our meeting. Thanks Ann Marie for designing the card and lining up the stamps perfectly on the MISTIs and thanks Sandy for bringing the extra set of stamps and MISTIs so the lines were not too long. The image is from a Tim Holtz Stampendous set called Flower Garden. I watercolored the flower with watercolor pencils. I am so lucky to have these ladies to play with every Wednesday afternoon!